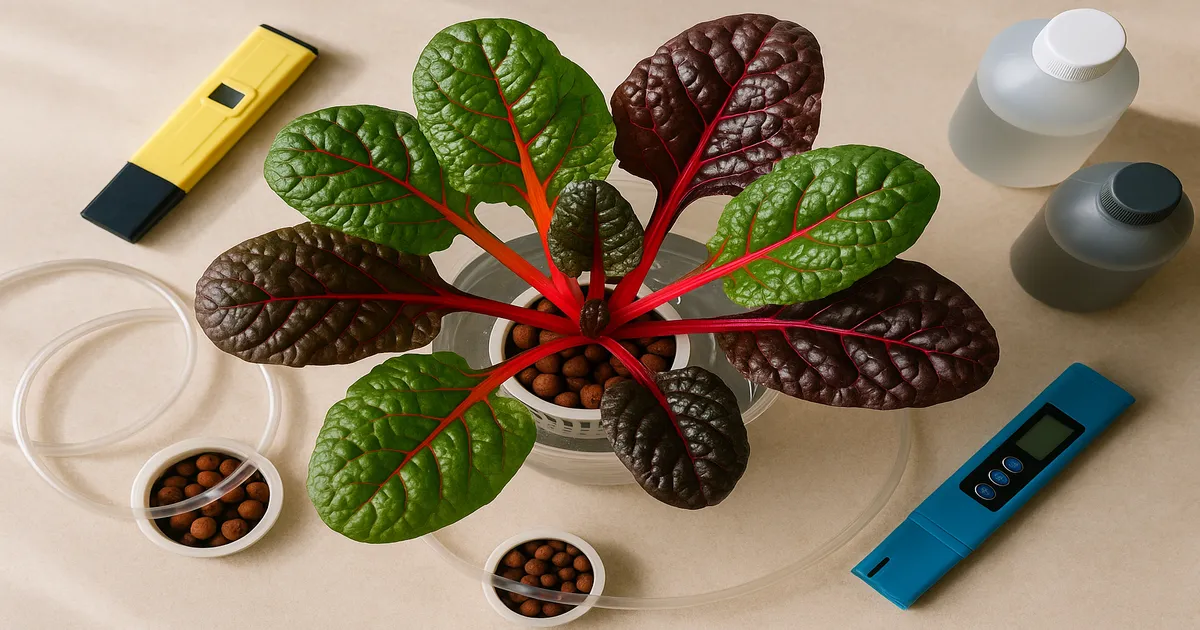
Quick Answer: Swiss chard (Beta vulgaris subsp. cicla) is one of the easiest leafy greens you can grow, whether in a backyard bed or a hydroponic system. It matures in 45–60 days from transplant, tolerates light frost down to 25°F (-4°C), and keeps producing with a cut-and-come-again harvest for 3–6 months — making it a genuinely rewarding crop for beginners and experienced growers alike.
If you want to learn how to grow Swiss chard, you’ve picked one of the most forgiving, productive vegetables in the leafy green family. It thrives in soil, containers, DWC, NFT, Kratky, and even aquaponics — second only to lettuce in beginner-friendliness for hydroponics. The colorful stalks and glossy leaves are a bonus.
How to Grow Swiss Chard: Key Facts at a Glance
- Plant: Beta vulgaris subsp. cicla (Amaranthaceae family, related to beets and spinach)
- Maturity: 45–60 days from transplant
- Harvest window: 3–6 months with cut-and-come-again method
- Frost tolerance: Down to 25°F (-4°C)
- Ideal temperature: 50–75°F (10–24°C)
- pH (soil): 6.0–7.0 | pH (hydro): 5.8–6.4
- Nutrients: Moderate-to-heavy feeder; high N and K demand
Soil vs. Hydroponics: Which Is Right for You?
| Factor | Soil | Hydroponics |
|---|---|---|
| Setup cost | Low | Medium–High |
| Difficulty | Beginner | Beginner–Intermediate |
| Growth speed | Standard | 20–30% faster |
| Water use | Higher | Up to 90% less |
| Yield per sq ft | Good | Excellent |
| Best for | Outdoor gardens, beginners | Year-round indoor growing |
Soil is more forgiving of mistakes and needs less monitoring. Hydroponics delivers faster growth and higher yields but demands attention to pH and EC. Both methods produce excellent chard — the right choice depends on your setup and goals.
Choosing the Best Swiss Chard Variety
Top Varieties for Hydroponic Systems
| Variety | Stalk Color | Days to Maturity | Best System |
|---|---|---|---|
| Fordhook Giant | White/cream | 50–60 days | DWC, NFT |
| Bright Lights | Rainbow (mixed) | 55–60 days | NFT (≥4” channels), DWC |
| Lucullus | White | 50–55 days | All hydro systems |
| Rhubarb Chard | Deep red | 55–60 days | DWC, Kratky |
| Rainbow Chard | Mixed colors | 55–65 days | NFT, DWC |
Fordhook Giant is the workhorse — big leaves, reliable yields, and it handles DWC beautifully. Bright Lights wins on market appeal and visual impact; just make sure your NFT channels are at least 4 inches wide for the thicker stalks.
For soil and containers, Lucullus stands out in warm climates thanks to its heat tolerance and vigorous growth. Rhubarb Chard brings the highest anthocyanin content and looks stunning in raised beds, though it grows slightly slower than white-stalked varieties. If maximum leaf production is your goal, stick with Fordhook Giant or Lucullus. In warm climates, always prioritize bolt-resistant varieties — it makes a real difference come midsummer.
Setting Up Your Growing System
Soil and Container Growing
Prepare beds with well-draining, compost-rich soil. Space plants 12–18 inches apart to allow for their large leaf spread. Raised beds with at least 8–12 inches of depth give roots room to develop and improve drainage — chard hates waterlogged soil.
For containers, use a minimum 5-gallon pot per plant. Anything smaller and you’ll see stunted growth and frequent watering stress. A well-draining potting mix amended with 20–30% perlite keeps roots oxygenated.
Deep Water Culture (DWC)
DWC is the most popular hydroponic method for chard at home. Use 3-inch net pots minimum (4-inch preferred for larger varieties), a reservoir depth of at least 8 inches, and a quality air stone to keep dissolved oxygen high. An air pump rated for your reservoir size is essential — roots should hang into oxygenated nutrient solution, not sit in stagnant water.
Nutrient Film Technique (NFT)
NFT works well for Swiss chard but requires channels at least 4 inches wide — the thick stalks need the space. Keep flow rates moderate (0.5–1 L/min per channel) and ensure channels slope at a 1:30–1:40 ratio for proper drainage. Shallower slopes cause pooling; steeper slopes dry out roots between passes.
Kratky Method (Passive Hydroponics)
Kratky is the no-pump, no-electricity approach. Fill a reservoir, suspend your net pot, and let the plant drink down the solution while an air gap forms above the roots. It works best with smaller chard varieties and is ideal for anyone who wants ultra-low-cost hydroponics. Top off with fresh nutrient solution as levels drop — don’t let the reservoir run dry.
Other Systems: Ebb and Flow, Aeroponics, and Aquaponics
Ebb and flow (flood and drain) suits larger-scale chard production well — reliable, automatable, and scalable. Aeroponics delivers the fastest growth rates but is the most complex and expensive to set up. Aquaponics is a natural fit; chard thrives on fish-waste nutrients and coexists well with tilapia, goldfish, or koi systems.
| System | Cost | Complexity | Yield |
|---|---|---|---|
| Soil/Raised Bed | Low | Low | Good |
| Container | Low | Low | Good |
| Kratky | Low | Low | Good–Very Good |
| DWC | Medium | Medium | Excellent |
| NFT | Medium | Medium | Excellent |
| Ebb & Flow | Medium–High | Medium | Excellent |
| Aeroponics | High | High | Best |
| Aquaponics | High | High | Very Good |
Nutrient Requirements for Swiss Chard
Macronutrients: N, P, and K
Swiss chard is a moderate-to-heavy feeder with a clear preference for nitrogen and potassium. Nitrogen drives leaf growth and that deep, rich green color — deficiency shows up as yellowing that starts on older leaves and works upward. Potassium is equally important for stem strength and water regulation, especially in colorful-stalked varieties. Phosphorus needs are moderate; it matters most during root development and early growth, but don’t overdo it during peak vegetative production.
Calcium, Magnesium, and Key Micronutrients
Calcium is non-negotiable for preventing tip burn — the most common quality issue in hydroponic chard. Magnesium supports chlorophyll production; deficiency causes interveinal chlorosis on older leaves.
Watch these three micronutrients closely:
- Iron: The most commonly deficient micronutrient. Causes interveinal chlorosis on young leaves (this distinguishes it from Mg deficiency). Keep pH below 6.5 in hydroponics to maintain iron availability.
- Boron: Critical for cell division and thick stem integrity. Deficiency causes hollow or cracked stems — a real problem in a crop grown for its stalks.
- Manganese: Supports photosynthesis; deficiency mimics iron deficiency but appears on slightly older tissue.
EC and PPM Targets by Growth Stage
| Growth Stage | PPM (500 scale) | EC (mS/cm) |
|---|---|---|
| Seedling (0–2 weeks) | 350–560 | 0.7–1.1 |
| Early Vegetative (2–4 weeks) | 560–840 | 1.1–1.7 |
| Established Vegetative (4+ weeks) | 840–1260 | 1.7–2.5 |
| Full Production | 1120–1540 | 2.2–3.1 |
Never exceed 1750 PPM (3.5 EC) — beyond that, you risk tip burn and salt stress. Always start seedlings at the low end; they’re sensitive.
Recommended Hydroponic Nutrient Recipe
For mid-vegetative stage chard in RO water (per gallon): (General Hydroponics Flora Series 3-Part)
- FloraGro: 5 mL/gal
- FloraMicro: 5 mL/gal
- FloraBloom: 2 mL/gal
- Cal-Mag supplement: 5 mL/gal
- Target: 900–1100 PPM (1.8–2.2 EC), pH 6.0–6.2
If you’re on RO or soft water, Cal-Mag supplementation at 150–200 PPM (0.3–0.4 EC) isn’t optional — it’s essential.
Fertilizing in Soil
At planting, amend beds with a balanced slow-release fertilizer (10-10-10 or 5-5-5). Every 3–4 weeks during active growth, side-dress with a nitrogen-rich source like blood meal, fish emulsion, or 21-0-0 ammonium sulfate. A foliar spray of diluted seaweed extract (0.5%) every two weeks adds a broad micronutrient boost without the risk of over-fertilizing.
pH and EC Management
Ideal pH Ranges
- Soil: 6.0–7.0, ideally 6.5
- Hydroponics: 5.8–6.4, ideally 6.0–6.2
Monitoring and Adjusting pH
A quality digital pH meter, calibrated weekly with pH 4.0 and 7.0 buffer solutions, is your most important tool. (Apera Instruments PH20) For larger systems, a combined pH and EC meter saves time and reduces the chance of missed readings. Check pH daily in active hydroponic systems; check EC every 1–2 days.
To raise pH, add pH Up (potassium hydroxide) in 1 mL increments per 5 gallons, mix thoroughly, and retest after 15 minutes. To lower it, use pH Down (phosphoric acid) the same way — small, incremental doses only. In soil, raise pH with agricultural lime and lower it with elemental sulfur; both take time to react, so plan ahead.
Why pH Drifts and How to Stabilize It
During rapid vegetative growth, chard preferentially absorbs anions (nitrate, phosphate), releasing hydroxide ions — this pushes pH up. When it absorbs cations like calcium and magnesium, pH drops. Both are normal, but you need to stay ahead of the swings. Practical stabilization strategies:
- Use reservoirs of at least 10 gallons per plant — larger volume buffers swings
- Change the full reservoir every 7–14 days
- Top off between changes with plain pH-adjusted water (plants drink water faster than nutrients, which concentrates the solution)
- Avoid ammonium-heavy formulas — nitrate-based nitrogen causes less pH drop
- Target pH 6.1 so you have buffer room in both directions
If EC keeps rising despite dilution, flush the system with plain pH-adjusted water (EC < 0.4 mS/cm) for 24–48 hours to clear salt buildup.
Lighting Requirements for Swiss Chard
PPFD, DLI, and Spectrum
Full-spectrum LEDs in the 3000–4000K range are ideal. Blue light (400–500 nm) keeps growth compact and leafy during early stages; red light (600–700 nm) drives photosynthesis efficiency as plants mature. Green light (500–600 nm) penetrates chard’s large, layered canopy to support lower leaves — don’t underestimate it.
| Growth Stage | PPFD (µmol/m²/s) | DLI (mol/m²/day) |
|---|---|---|
| Seedling | 100–200 | 8–12 |
| Early Vegetative | 200–400 | 12–18 |
| Established Vegetative | 400–600 | 18–25 |
| Full Production | 500–700 | 20–30 |
Swiss chard’s light saturation point is around 600–800 µmol/m²/s. Pushing beyond that wastes electricity. A DLI of 17–25 mol/m²/day is your sweet spot for maximum yield.
Photoperiod and Bolting Prevention
Run an 18/6 photoperiod (18 hours light, 6 hours dark) for maximum vegetative growth indoors. A 16/8 schedule reduces electricity costs with minimal yield loss. Chard bolts when long days combine with warm temperatures — keeping your grow room below 75°F (24°C) dramatically reduces bolt risk even under extended light hours.
Recommended LED Grow Lights
For home or hobby grows covering 1–4 sq ft, a ~100W quantum board like the Spider Farmer SF-1000 covers a 2×2 ft area at proper intensity and runs efficiently. For mid-scale setups of 4–16 sq ft, step up to the Spider Farmer SF-2000 or the HLG 200 Rspec — both deliver excellent efficiency for home NFT or DWC setups. Mount quantum boards 18–24 inches above the canopy for established chard, and 24–36 inches (or dimmed to 50%) for seedlings.
Planting, Care, and Harvesting Swiss Chard
Starting from Seed
Soak seeds for 2–4 hours before planting to soften the seed coat and speed germination. Sow 0.5 inches deep; germination occurs within 5–10 days at soil temperatures of 50–85°F (10–29°C). Keep seedling nutrient solution at the low end — 350–560 PPM (0.7–1.1 EC). Seedlings are salt-sensitive, and starting too strong is one of the most common beginner mistakes. Maintain humidity around 60–70% and gentle airflow to prevent damping off.
Transplant seedlings into your hydroponic system or garden bed at the 2–3 true leaf stage. Earlier than that and they’re fragile; later and you risk disturbing an established root system.
Temperature and Environmental Controls
Ideal growing temperatures are 50–75°F (10–24°C). Above 85°F (29°C), bolting risk increases sharply and leaf quality declines. In hydroponic systems, keep reservoir temperature at 65–72°F (18–22°C) to maintain dissolved oxygen levels and suppress root pathogens.
The Cut-and-Come-Again Harvest Method
This is what makes Swiss chard so productive. When outer leaves reach 6–10 inches long, harvest them by cutting or snapping at the base of the stem. Always leave the central growing point (the crown) intact — that’s where new growth originates. Harvest every 1–2 weeks. Consistent harvesting actively encourages the plant to keep producing, and a single plant can supply you for 3–6 months when managed well.
Extending Your Harvest Season
For outdoor growers, succession plant every 3–4 weeks for a continuous supply through spring and fall. Use row cover to protect plants through light frosts — chard handles temperatures down to 25°F (-4°C) with good cover. In summer, 30–40% shade cloth slows bolting in hot climates.
Troubleshooting Common Swiss Chard Problems
Yellowing Leaves: Nitrogen or Iron Deficiency?
The location of yellowing tells you everything. Nitrogen deficiency starts on the oldest, lowest leaves and moves upward — the plant is cannibalizing older tissue to feed new growth. Iron deficiency shows as interveinal chlorosis (yellow between green veins) on the youngest leaves. For iron issues, check your pH first — if it’s above 6.5 in hydroponics, iron becomes unavailable regardless of how much is in your solution.
Tip Burn and Distorted New Growth
Tip burn is a calcium delivery problem, not always a calcium shortage. Even with adequate Cal-Mag in your reservoir, low transpiration caused by stagnant air or high humidity prevents calcium from moving through the plant. Increase airflow with a small oscillating fan, verify your Cal-Mag dosing, and check that reservoir EC isn’t so high it’s limiting water uptake.
Bolting
Bolting is triggered by a combination of long days and heat. Indoors, keep temperatures below 75°F and run no more than 18 hours of light. Outdoors, use shade cloth in summer and choose bolt-resistant varieties like Lucullus. Once a plant bolts, leaf quality drops quickly — harvest aggressively and consider replacing it.
Root Rot
Slimy, brown roots with a foul smell indicate Pythium or a related water mold. The cause is almost always low dissolved oxygen, high reservoir temperature, or both. Increase aeration, drop reservoir temperature to 65–68°F, and consider adding a beneficial bacteria product like Hydroguard to the reservoir. Affected roots won’t recover, but healthy white roots will regrow if you catch it early.
Slow Growth or Pale Leaves Despite Correct Nutrients
If your pH and EC look right but growth is sluggish, check your light intensity first — insufficient DLI is the most common overlooked cause. Also verify reservoir temperature; roots below 60°F absorb nutrients poorly even when everything else is dialed in.
Frequently Asked Questions
How long does Swiss chard take to grow? From transplant, Swiss chard reaches first harvest in 45–60 days. With the cut-and-come-again method, a single plant continues producing for 3–6 months.
Can you grow Swiss chard hydroponically? Yes — it’s one of the best leafy greens for hydroponics. DWC and NFT are the most popular systems for home growers. Kratky works well for beginners who want a low-cost, low-maintenance setup.
What is the best pH for growing Swiss chard in hydroponics? Keep pH between 5.8 and 6.4, with 6.0–6.2 as the ideal target. Outside this range, nutrient availability drops sharply — iron and calcium are the first to become deficient.
How often should I harvest Swiss chard? Harvest outer leaves every 1–2 weeks once they reach 6–10 inches long. Regular harvesting encourages continuous new growth. Always leave the central crown intact.
Does Swiss chard need a lot of light? It needs moderate light — a DLI of 17–25 mol/m²/day covers most growth stages. Its light saturation point is around 600–800 µmol/m²/s, so very high-intensity lighting delivers diminishing returns and wastes energy.